We are expanding
our material know-how
and test services with
the DEKRA laboratories!
Find out more in our
press release.
News:
Titanium alloys and titanium purity of medical instruments and implants according to
test laboratory
for materials testing, product testing & failure analysis.
Your specialist for metals,
plastics, elastomers.
We are expanding
our material know-how
and test services with
the DEKRA laboratories!
Find out more in our
press release.
News:
Titanium alloys and titanium purity of medical instruments and implants
according to DIN EN ISO 832
Accredited test laboratory
to DIN EN ISO / IEC 17025.
Your specialist for metals,
plastics, elastomers.
Measure surface roughness according to DIN EN ISO 4288.
Surfaces are extremely diverse – from smooth, glossy to rough, matt. These differences result from the different surface roughness of a component. Differences in surface roughness change the visible appearance on the one hand, but they also affect a number of other properties on the other. These include, for example, the expected wear or the tightness when the component comes into contact with a corresponding counter component or the thickness of the paint application when a component is coated. It is therefore necessary to quantify the surface roughness, i.e. the microscopic unevenness of a surface. There are countless methods that can be used to do this.
Which roughness parameters characterize the surface quality?
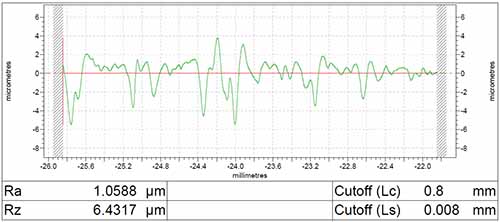
We determine the most important roughness parameters of a surface by using a roughness measuring device (probe) to measure a two- or three-dimensional profile of the surface in question. From this, different roughness parameters are calculated that characterize the surface properties:
- Ra = arithmetic mean roughness
Ra is the generally recognized and internationally used roughness parameter. It is the arithmetic mean of the absolute values of the profile deviations within the reference distance. The measured numerical value Ra is always smaller than the Rz value determined on the same roughness profile. - Rz =mean roughness
The mean roughness depth Rz is the arithmetic mean of the greatest individual roughness depths of several adjacent individual measuring sections - Rt = maximum roughness
The maximum surface roughness denotes the vertical difference between the deepest groove and the highest peak of the total measuring section
The surface height is examined with Rz measurements and the smoothness of sliding surfaces with Ra measurements. Since some points such as individual protrusions may be missed when using the Ra analysis alone, it is important that the Ra and Rz analyzes are used in combination.
Case study for the measurement of surface roughness according to DIN EN ISO 4288.

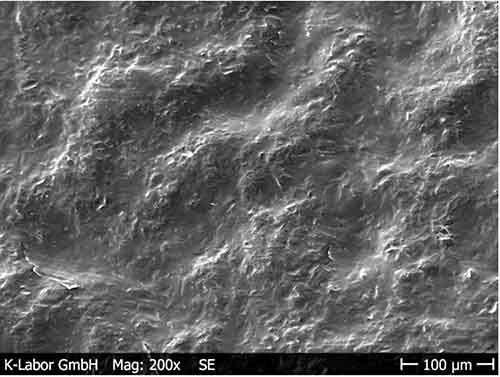
Documentation of the surface of a sleeve made of PP using a scanning electron microscope


