We are expanding
our material know-how
and test services with
the DEKRA laboratories!
Find out more in our
press release.
News:
Titanium alloys and titanium purity of medical instruments and implants according to
test laboratory
for materials testing, product testing & failure analysis.
Your specialist for metals,
plastics, elastomers.
We are expanding
our material know-how
and test services with
the DEKRA laboratories!
Find out more in our
press release.
News:
Titanium alloys and titanium purity of medical instruments and implants
according to DIN EN ISO 832
Accredited test laboratory
to DIN EN ISO / IEC 17025.
Your specialist for metals,
plastics, elastomers.
Hardness testing of metals.
Hardness is the mechanical resistance that a material opposes to the mechanical penetration of a harder, a softer, or an equally hard test specimen. Within the various stages of the manufacturing process, the hardness test is an indispensable step in the quality assurance of a product. Depending on the type of action, a distinction is made between different types of hardness. Various test methods are available for testing the hardness of metals.
The hardness test method which is suitable for your project depends, among other things, on the material to be measured.
All hardness testing methods have a common basic principle:
A standardized test body – for example a diamond pyramid / cone or hard metal ball – is pressed onto the surface of the material. Then the surface or the penetration depth of a test body is measured.
Hardness is often a good indicator of the tensile and wear properties of a material.
The definition of hardness differs from that of strength.
This represents the resistance of a material to deformation.
The hardness, along with strength, ductility, rigidity, fracture toughness, density and melting temperature, is one of the material properties.
Our services at a glance:
- Brinell hardness (HB) according to DIN EN ISO 6506
- Vickers hardness (HV) according to DIN EN ISO 6507
- Rockwell hardness (HRC) according to DIN EN ISO 6508
- Knoop hardness according to DIN EN ISO 4545-1
- Vickers microhardness (HV) based on DIN EN ISO 6507
- Case hardening depth (CHD) according to DIN 6773 and DN ISO 15787
- Nitriding hardness depth (NHT) according to DIN 6773 and DN ISO 15787
- Surface hardness depth (RHT) according to DIN 6773 and DN ISO 15787
- Hardness progression test according to DIN 6773 and DN ISO 15787
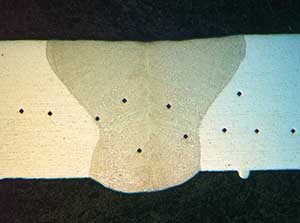
- Hardness test in a weld seam according to DIN EN ISO 9015
Brinell hardness test (HBW) in accordance with DIN EN ISO 6506.
In the Brinell hardness test, a hard metal ball (tungsten carbide) with a certain ball diameter is pressed as an indenter under a defined force vertically into the surface of a sample. We use the Brinell hardness test to check the hardness of ferrous and non-ferrous materials. With the Brinell hardness test, however, only soft to medium-hard workpieces can be tested for hardness.
Vickers (HV) test in accordance with DIN EN ISO 6507.
In the Vickers hardness test (Vickers hardness), a diamond pyramid with a square base and a surface angle of 136 ° is pressed vertically into the specimen under a defined force. The hardness measurement is used to check the hardness properties of all metals.
The Vickers hardness measurement is particularly suitable for measurements with low test forces for thin and small parts, or in some cases also layers or workpieces with surface treatment.

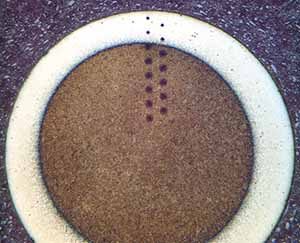
Hardness progression test in a rivet bolt

Hardness progression test in a weld seam
Testing according to Rockwell (HRC) in accordance with DIN EN ISO 6508.
In contrast to the Brinell and Vickers hardness test methods, the Rockwell hardness of a material results from the penetration depth of an indenter (diamond cone) when a certain pre-test and test force is applied.
This hardness test is used to check the hardness properties of ferrous materials, especially when they are hardened.
The test body is preloaded into the surface of the workpiece to be tested with a specified test force. The depth of the penetration of the test body under preload serves as a reference plane. The indenter is then subjected to the main load for a period of at least two and a maximum of six seconds. This is then removed again so that only the preload is effective.
The measure for the Rockwell hardness of the material is the difference in the penetration depths before and after the main load is applied. The rock wave units are calculated from the penetration depth. The penetration depth of the test body is determined with a dial gauge connected to the test probe.

